How to Read Your Electricity Bill and Estimate Solar Savings
Before you can properly size a solar system or estimate realistic savings, you need to understand your own electricity bill — which, admittedly, isn't always straightforward given the various charges, slabs, and units that appear on a typical Indian DISCOM bill. This guide walks through exactly what to look for.
The Numbers That Actually Matter
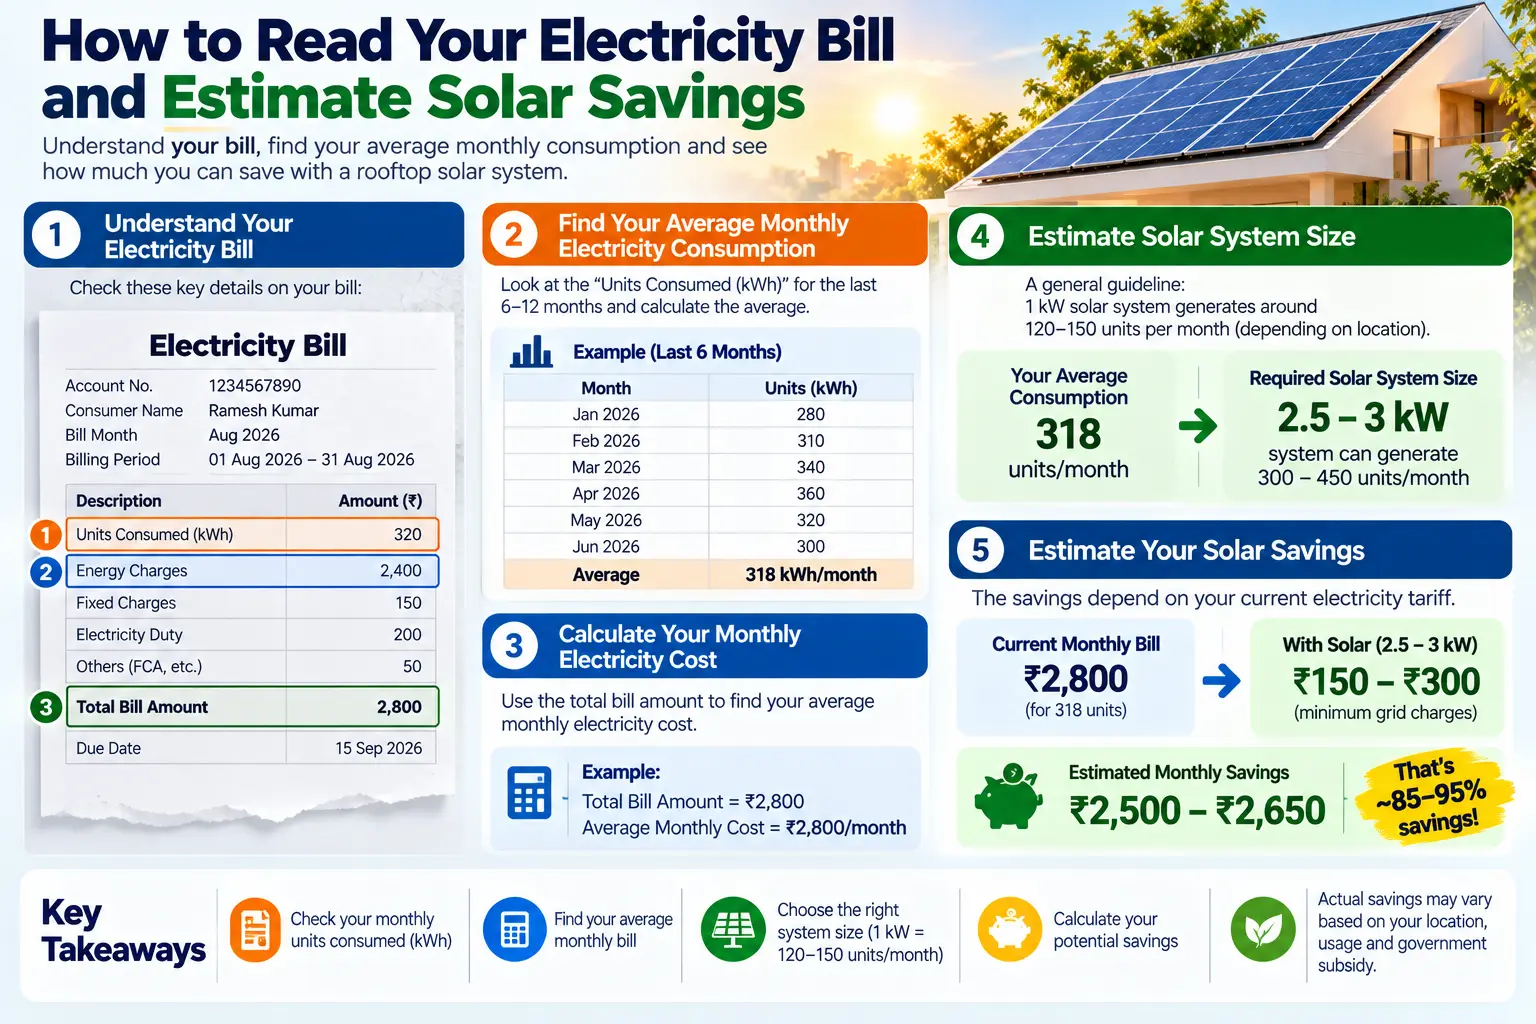
The single most important figure on your bill is your monthly units consumed, typically labelled as "units" or "kWh" — this is the raw electricity consumption your household or business uses each billing cycle, and it's the number your solar system needs to be sized against to deliver meaningful savings. Most DISCOM bills also show consumption history for the past several months, which is valuable since consumption often varies seasonally (higher in summer due to air conditioning and cooling loads, for instance) — a good installer will want to see this history rather than just your most recent single bill, to size your system against your actual annual average rather than one unusually high or low month.
Alongside total units, check whether your bill shows a tariff slab structure — many DISCOMs charge progressively higher per-unit rates as consumption increases within a billing cycle, meaning your "effective" savings per unit of solar generation can actually be higher than your average bill amount suggests, since solar typically reduces consumption from the higher-rate slabs first.
Working Out Your Realistic Savings Estimate
To get a rough estimate of appropriate system size, take your average monthly units consumed over the past 12 months (adding up your recent bills and dividing by the number of months gives a reasonable average) and divide by roughly 120 — this gives an approximate kW capacity that would offset your typical monthly consumption, based on average generation of about 4 units per kW per day in most parts of India (this varies somewhat by location and season, so treat it as a starting estimate rather than a precise figure).
For example, if your bills show an average of 350 units per month, dividing by 120 suggests a system size of roughly 3 kW would meaningfully offset your typical consumption — though your installer's site-specific assessment (accounting for your exact roof orientation, shading, and local solar irradiance) will refine this further into an actual recommendation.
To estimate savings, multiply your average monthly units by your effective per-unit tariff rate (found on your bill, or calculated by dividing your total bill amount by total units, keeping in mind the slab structure mentioned above) — this gives you a rough sense of your current monthly electricity spend, most of which a well-sized solar system can eliminate, minus whatever residual grid draw remains during low-sun periods and the fixed minimum charge most DISCOMs levy regardless of consumption.
It's worth being realistic rather than overly optimistic in this estimate: very few residential solar systems eliminate the electricity bill entirely, since some grid draw during nighttime and low-sun periods is typical unless paired with substantial battery storage. A well-sized on-grid system bringing your bill down by 70-90% (rather than to zero) is a more realistic, achievable target for most households, and still represents substantial, meaningful savings over the system's lifetime.
How Net Metering Works
Net metering is the billing arrangement that makes rooftop solar financially worthwhile for most Indian households and businesses. Once your solar system is installed, the DISCOM replaces your regular meter with a bi-directional net meter that can measure electricity flowing both ways — the power you draw from the grid, and the surplus solar power you export back to it.
During the day, your solar panels generate electricity that first powers whatever appliances are running in your home or business. Any extra power your panels produce beyond what you're using gets exported to the grid, and the net meter records this as a credit. In the evening or on cloudy days, when your panels aren't generating enough, you draw power back from the grid as usual. At the end of the billing cycle, you're only charged for the net units consumed — total units drawn from the grid minus total units exported to it.
This means the grid effectively acts as a free "battery" for your solar system during the day, and you only pay the DISCOM for the shortfall. For most homes with a well-sized rooftop system, this can bring monthly electricity bills down by 70–90%, and in some cases reduce them to the fixed minimum charge only.
Cost and Payback Period
The cost of a rooftop solar system in India varies with system size, panel and inverter brand, roof type, and installation complexity, but as a rough benchmark, a good-quality on-grid residential system typically costs between ₹50,000 and ₹65,000 per kW before subsidy, using Tier-1, DCR-compliant components. After applying the government subsidy under PM Surya Ghar (up to ₹78,000 for a 3 kW system), the net out-of-pocket cost drops meaningfully.
Payback period — the time it takes for your electricity bill savings to equal your net investment — usually works out to between 3 and 6 years for most residential and commercial systems in India, depending on your local electricity tariff, how much of your solar generation you self-consume versus export, and how well the system is sized to your actual usage pattern. After the payback period, the electricity generated is essentially free for the remaining 18–22 years of the panel's rated life, making solar one of the few home investments that pays for itself and then keeps paying dividends.
What Is the PM Surya Ghar Muft Bijli Yojana?
Launched by the Government of India in February 2024, the PM Surya Ghar Muft Bijli Yojana is the country's flagship scheme for residential rooftop solar. Its goal is to get solar panels onto one crore (10 million) homes, and it does this by offering a direct subsidy — called Central Financial Assistance (CFA) — straight into the homeowner's bank account after installation, rather than routing it through the installer.
Under the scheme, households can get a subsidy of ₹30,000 per kW for the first 2 kW of capacity, and ₹18,000 per kW for the next 1 kW (i.e., the 2–3 kW slab), capped at a maximum of ₹78,000 for systems of 3 kW or larger. A household installing a 3 kW system, for example, can expect to receive close to ₹78,000 back from the government, substantially reducing the net cost of going solar.
To apply, homeowners register on the national portal (pmsuryaghar.gov.in), select their state and electricity distribution company (DISCOM), and choose an empanelled vendor to carry out the installation. Net metering is arranged through the DISCOM once installation is complete and inspected, after which the subsidy is credited directly to the applicant's bank account — usually within 30 to 45 days of a successful net-meter installation.
How to Choose the Right Solar Installer
The quality of your solar installation depends heavily on who installs it, not just what equipment you buy. When evaluating an EPC (Engineering, Procurement and Construction) company, start by checking whether they're empanelled with your state's renewable energy agency and DISCOM — this is a mandatory requirement to be eligible for government subsidy under schemes like PM Surya Ghar and PM-KUSUM.
Ask to see examples of their completed installations in your area, and if possible, speak to a couple of their past customers about the after-sales experience — how they handled warranty claims, whether the system's actual output matched what was promised, and how quickly they responded to service requests. A trustworthy installer will always conduct a proper site visit before quoting, checking your roof's shading, orientation, structural strength, and your actual electricity consumption pattern, rather than quoting a one-size-fits-all package over the phone.
Finally, insist on a clear, itemised quotation that separately lists the panel brand and wattage, inverter brand and capacity, mounting structure type, cabling and balance-of-system components, and installation charges — along with the warranty terms for each component (panels typically carry a 25-year performance warranty, inverters 5–10 years). Avoid installers who are vague about brands or bundle everything into a single opaque number.
Why Solar Makes Sense in India
India receives an average of 300 sunny days a year and among the highest solar irradiance levels in the world, which is precisely why the country has made solar power a cornerstone of its energy policy. For homeowners and businesses, this translates into a straightforward proposition: install a solar system once, and it keeps generating free electricity from sunlight for the next 25 years or more, dramatically cutting down what you pay to the grid.
Rising electricity tariffs, frequent hikes by state electricity boards, and the volatility of diesel prices for backup power have made solar an increasingly obvious financial decision, not just an environmental one. Combined with central and state government subsidies, the payback period on a typical residential or commercial rooftop solar system in India today ranges between 3 to 6 years, after which the electricity generated is effectively free for the remaining life of the system.
Beyond the financial case, solar also insulates households and businesses from unplanned power cuts, voltage fluctuations, and the uncertainty of grid supply in many semi-urban and rural parts of the country — a benefit that's often just as valuable as the money saved.
Maintenance and Lifespan
One of solar power's biggest practical advantages is how little maintenance it needs. With no moving parts, solar panels typically require nothing more than periodic cleaning to remove dust, bird droppings, and pollen that can reduce output — in most parts of India, cleaning once every 2–4 weeks (more frequently during dry, dusty months, less during and after the monsoon) is enough to keep output close to optimal.
Panels themselves are extremely durable, typically carrying a 25-year performance warranty guaranteeing they'll still produce at least 80–85% of their original rated output after a quarter century — degradation of roughly 0.5–0.8% per year is normal and expected. Inverters have a shorter lifespan than panels, typically needing replacement once every 10–15 years, so it's worth factoring this into your long-term cost calculations. Beyond cleaning and an occasional visual inspection for loose wiring or physical damage, a well-installed solar system needs very little hands-on attention to keep delivering reliable output year after year.
Frequently Asked Questions
Why does my bill show different rates for different consumption slabs?
Most Indian DISCOMs use a tiered (slab-based) tariff structure, where the per-unit rate increases as your total consumption in a billing cycle rises — this is designed to encourage conservation, and it means solar savings can be proportionally larger than a simple average-rate calculation might suggest, since solar typically reduces the highest-rate slab consumption first.
Should I size my solar system based on my highest-consumption month or my average?
Most installers recommend sizing based on your average annual consumption rather than your peak month, since oversizing for a single high-usage month (like peak summer) means generating excess surplus you may not fully monetise for the rest of the year, depending on your state's net metering export credit rules.
What if my consumption varies a lot between seasons?
This is common (especially with seasonal air conditioning use) and worth discussing explicitly with your installer, who can help find the right balance between covering your higher-usage months and not excessively oversizing for the rest of the year.
Does my bill show how much CO2 or environmental impact I'm having?
Some DISCOM bills now include this information, though it's not universal — this isn't essential for savings calculations, but can be a useful reference point if environmental impact factors into your decision alongside the financial case.
How often should I recheck my bill after installing solar to confirm savings are on track?
Checking your first few post-installation bills closely is worthwhile to confirm the net metering credit is being applied correctly and savings roughly match expectations — after that, a periodic annual check (alongside monitoring your solar generation app, if available) is generally sufficient.
Final Thoughts
Understanding your own electricity bill in detail — not just the final amount due, but the underlying units consumed and tariff structure — puts you in a much stronger position when evaluating solar quotes and setting realistic savings expectations. This groundwork takes just a few minutes with your recent bills in hand, but makes a real difference in how well your eventual solar system actually matches your needs.